Sky is the limit: Frida
Frida – A world-class dynamic instrumentation framework:
Frida is a powerful dynamic instrumentation framework that enables comprehensive testing of Android, iOS, and OS applications. Its versatile capabilities make it a world-class tool for dynamic application testing. If you’re interested in learning more about Frida, you can visit the official Frida Docs page. To showcase the tool’s capabilities, I will provide a complete demonstration of its use with an Android application.
Deep dive into Frida Framework:
I have developed a simple Android application that implements SSL pinning. Before we dive into the details of how it works, let’s take a look at the code.
// I have simplify code for your understanding. You need to modify as per your need in order to use this code.
public class MainActivity extends AppCompatActivity {
    Button On_Click;
    Reseponse response_data;
    private OkHttpClient okHttpClient;
    @Override
    protected void onCreate(Bundle savedInstanceState) {
        super.onCreate(savedInstanceState);
        setContentView(R.layout.activity_main);
        final TextView mytextview = (TextView) findViewById(R.id.response_textview);
        On_Click = findViewById(R.id.On_Click);
        On_Click.setOnClickListener(new View.OnClickListener() {
            public void onClick(View v) {
                ssl_pinning_test();
            }
        });
    }
    private void ssl_pinning_test(){
        Thread sending_https_request = new Thread(){
                @Override
                public void run() {
                    runOnUiThread(new Runnable() {
                        public void run() {
                            final TextView mytextview = (TextView) findViewById(R.id.response_textview);
                            String hostname = "www.google.com";
                            final CertificatePinner certificatePinner = new CertificatePinner.Builder().add(hostname,"sha256/hOokvnMxDPQLqjFuiypNhVVd3vKmfbeJsYCoVBI2asI=").add(hostname,"sha256/YLh1dUR9y6Kja30RrAn7JKnbQG/uEtLMkBgFF2Fuihg=").add(hostname,"sha256/Vjs8r4z+80wjNcr1YKj7WQboSIRi63WsWXhIMN+eWys=").build();
                            okHttpClient = new OkHttpClient.Builder().certificatePinner(certificatePinner).build();
                            final Request request = new Request.Builder().url("https://"+hostname).build();
                            final Thread t = new Thread(new Runnable() {
                                @Override
                                public void run() {
                                    try {
                                        response_data = okHttpClient.newCall(request).execute();
                                        mytextview.setText("Connection establish successfully"+response_data.toString());
                                    } catch (IOException e) {
                                        mytextview.setText("Connection can not able to established : "+e.toString());
                                        e.printStackTrace();
                                    }
                                }
                            });
                        t.start();
                        }
                    });
                }
            };
        sending_https_request.start();
    }
};
Let me explain you code,
The code uses the OkHttpClient library to establish an HTTPS connection between an Android device and a server. To implement SSL pinning, we have chosen to verify the server certificate via its hardcoded fingerprint. (For a more in-depth look at various SSL pinning methods, you can refer to our blog by Clicking here.) When the application is opened, a button is displayed on the screen. Upon clicking this button, an HTTPS connection is established with “Google.com”.
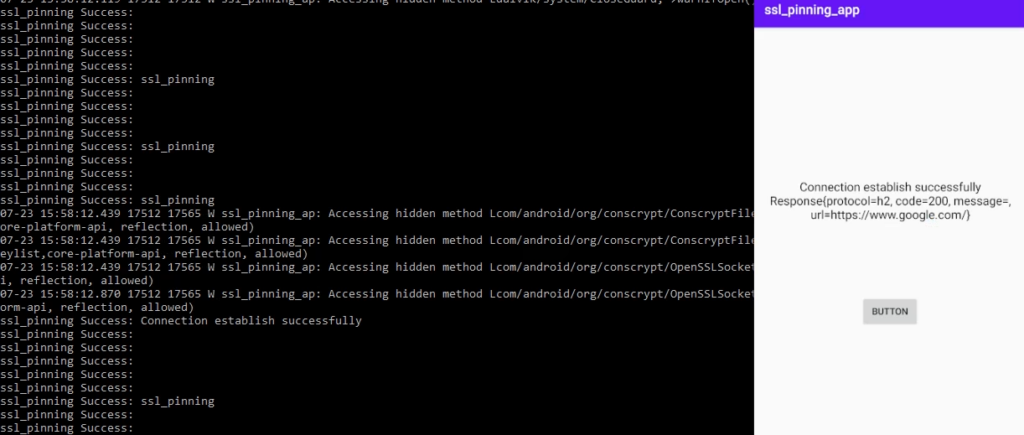
On the left side, you can view the output of the “logcat” command via the ADB shell. On the right side, you can see the screen of my Android mobile device.
adb shell
logcat
To capture the HTTPS request in BurpSuite, we need to configure the proxy settings in the Android device. Follow these steps:
- Start BurpSuite on your computer.
- Go to the “Proxy” tab and then select the “Options” sub-tab.
- Note down the IP address and port number shown in the “Proxy listener” section. It will be something like “[Local IP]:[Local Port]”.
- On your Android device, go to “Settings” > “Wi-Fi” > long-press on the connected network > “Modify network”.
- Select “Advanced options” and then set the “Proxy” option to “Manual”.
- Enter the IP address and port number that you noted down in step 3.
- Click “Save” to apply the changes.
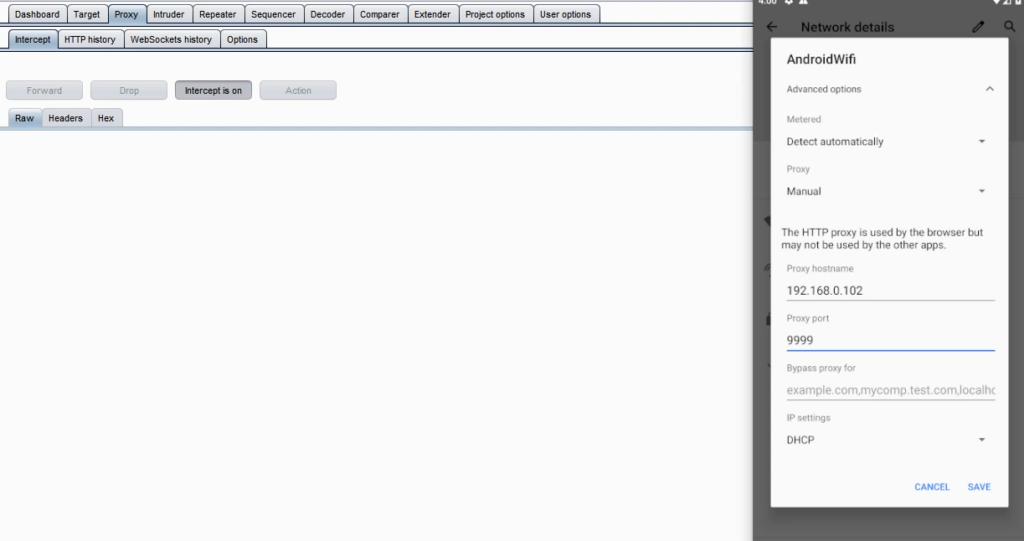
Now, when you click the button in the SSL pinning application, the HTTPS request will be captured by BurpSuite.
About SSL Pinning,
SSL pinning is a method used to prevent Man-in-the-Middle (MITM) attacks and establish a secure connection between a server and a mobile device. It achieves this by allowing the application to only trust a specific, pre-defined certificate or public key.
However, it’s important to note that SSL pinning verification happens on the client-side, which means it’s possible to bypass the SSL pinning logic. Nowadays, there are many automated tools like Objection (using Frida) and SSLKillSwitch (for iOS) available, but sometimes it’s necessary to build our own script to bypass client-side verifications such as biometric and app pinning.
In rare scenarios, you may need to perform reverse engineering of the APK/IPA file and manipulate variable values. JadxGui is a tool that can help you retrieve the Java code from the APK file (although a similar process is not available for IPA files).
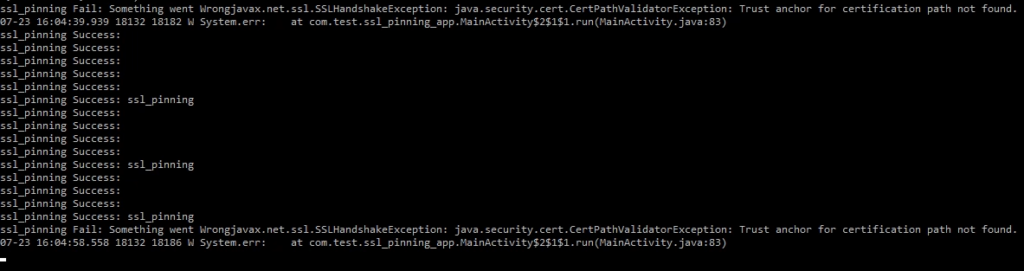
After configuring the proxy settings of the Android device through Burp, we can capture the entire communication. However, due to SSL pinning failing on the client-side (caused by the Burp certification), we may encounter an SSL Handshake error as shown below.
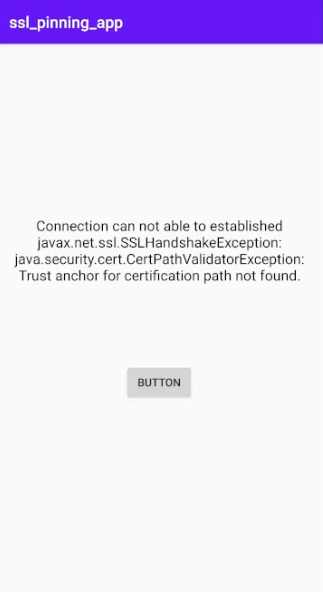
Observe below “logcat” output.

Starting Frida server,
# Commands to run on Linux
wget https://github.com/frida/frida/releases/download/14.0.8/frida-server-14.0.8-android-x86.xz
unxz frida-server-14.0.8-android-x86.xz
adb push "frida-server-14.0.8-android-x86" "/data/local/tmp/frida_server"
adb shell
# Commands to run on Android (Make sure you have connnected android device via USB to Laptop)
cd /data/local/tmp/
chmod +x frida_server
./frida_server &
# for more you can visit "https://frida.re/docs/android/".
Using the commands above, you can download and start the Frida server on an Android device. There are many blogs available that provide detailed information on the working of the Frida server.
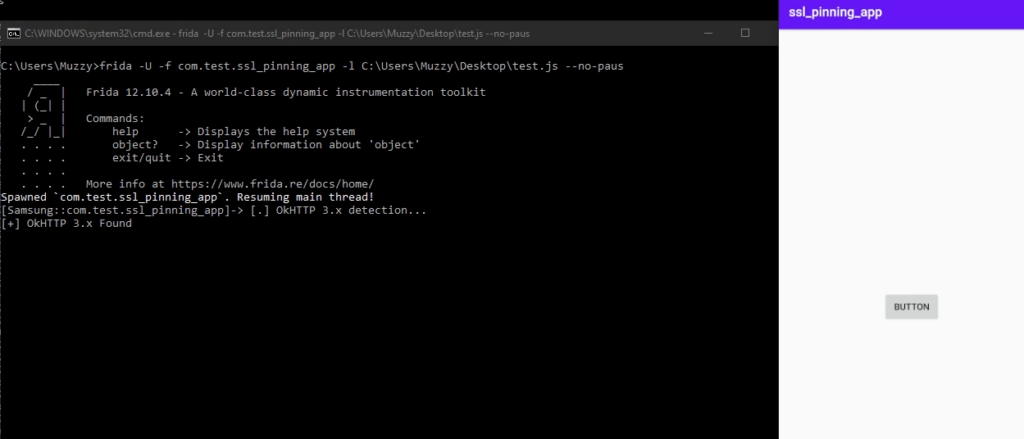
To briefly explain the workings of the Frida framework, you need to install Frida on a Linux system using the command “pip install Frida-tools”. Frida is a python-based application that supports JavaScript injection at runtime. The Linux installed Frida application communicates with the Frida server installed on the Android device via a USB connection. We can send scripts from the Frida app to the Frida server.
Please refer to the screenshot below for the command to start the Frida server.

Before we proceed with bypassing SSL pinning, let me demonstrate how we can change parameter values using Frida at runtime. I have written a small Frida script to change the text area value during runtime.
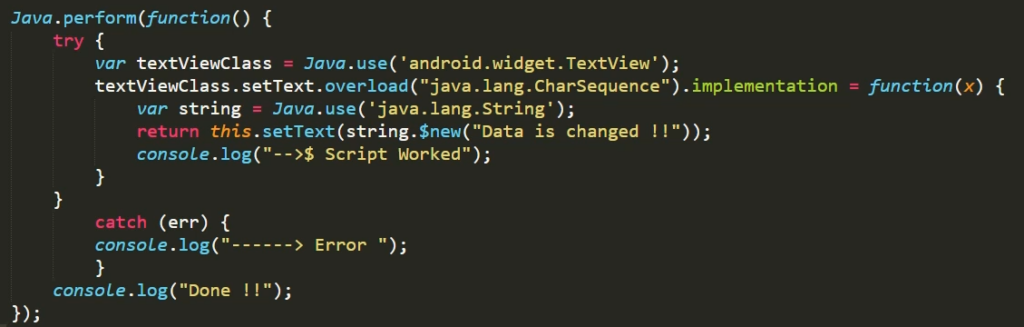
Start the application using Frida and click on the button.
frida -U -f [app_name] -l [path_to_js_file] --no-pause
# -U -> Indicate the Frida server is connected via USB cabble(You can give remote server ip&port)
# -f -> application name you can find via "adb shell cmd package list packages"
# -l -> file path where you have saved the script
# --no-pause -> If flag isn't set, you will be dropped into a Frida shell, where the program will sit without executing.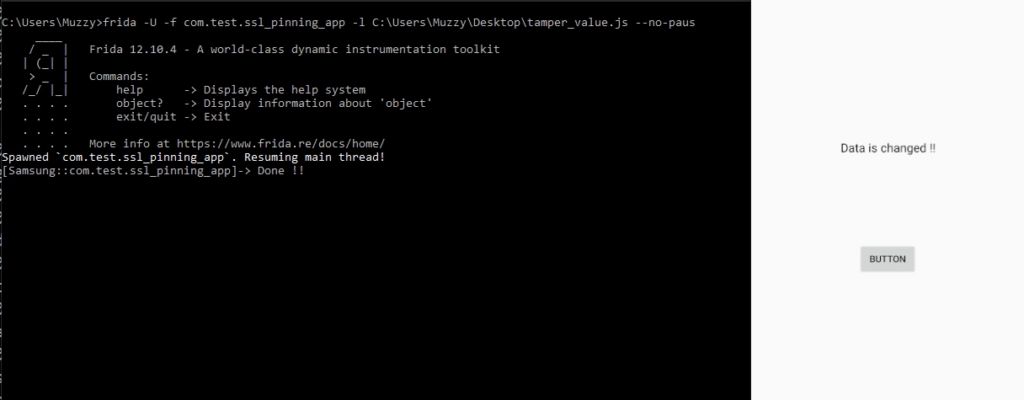
At the same time, you can observe that the log file outputs the same as before. This means that an error occurred, but we were able to hide it by changing the parameter value using the Frida script.
SSL Pinning Bypass:
Let’s bypass SSL pinning using Frida. I have written code to bypass it using the okHTTP and TrustManager libraries.
// below code will toggle the return value of SSL pinning and trust the all certificatation.
Java.perform(function(){
console.log("");
console.log("Try to bypass SSL Pinning");
var SSLContext = Java.use("javax.net.ssl.SSLContext");
var X509TrustManager = Java.use('javax.net.ssl.X509TrustManager');
var TrustManager = Java.registerClass({
name: 'com.sensepost.test.TrustManager',
implements: [X509TrustManager],
methods: {
checkClientTrusted: function(chain, authType) {},
checkServerTrusted: function(chain, authType) {},
getAcceptedIssuers: function() {
return [];
}
}
});
var TrustManagers = [TrustManager.$new()];
var SSLContext_init = SSLContext.init.overload('[Ljavax.net.ssl.KeyManager;', '[Ljavax.net.ssl.TrustManager;', 'java.security.SecureRandom');
try {
SSLContext_init.implementation = function(keyManager, trustManager, secureRandom) {
SSLContext_init.call(this, keyManager, TrustManagers, secureRandom);
console.log("[+] Bypass with TrustManagers");
};
} catch (err) {
console.log("[-] TrustManager Not Found");
}
try {
var CertificatePinner = Java.use('okhttp3.CertificatePinner');
CertificatePinner.check.overload('java.lang.String', 'java.util.List').implementation = function() {
console.log("[+] OkHTTP Bypass");
};
} catch (err) {
console.log("[-] OkHTTP 3.x Not Found")
}
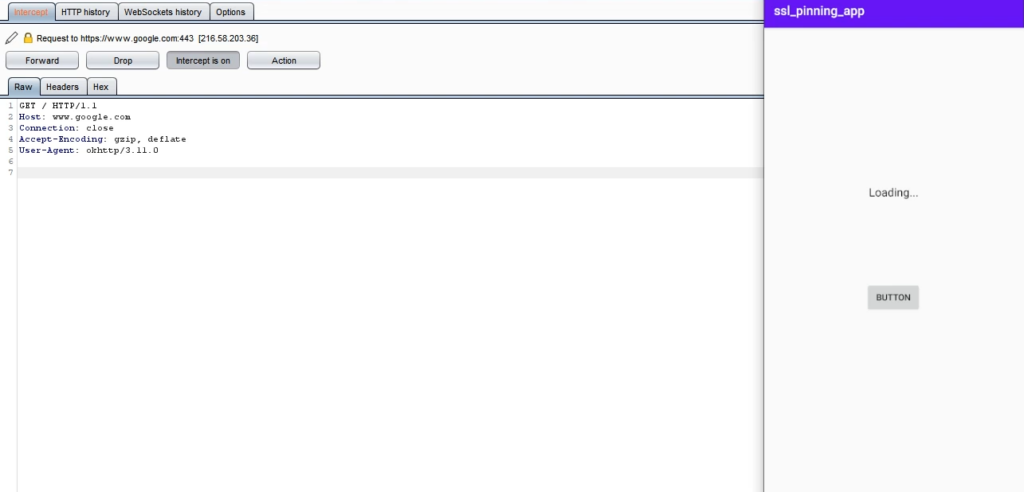
});Run the Frida command to hook this script and click on the button. Observe the screenshot below.
We have successfully bypassed SSL pinning and are now able to intercept the HTTPS traffic in BurpSuite.
Curious about what happened on the backend side? We changed the return value of the okHTTP function and, with the help of the TrustManager, we trusted all certifications, including Burp’s. So, the application’s validation function returned a true value, and it started communicating with the server via Burp.
Hooking with thick client application:
Hooking with thick client applications is also possible with Frida, as it supports all cross-platforms. We can hook Windows applications with the help of Fermion (https://github.com/FuzzySecurity/Fermion), which helps to create a simple script and bind it with the running application.
Frida support all cross-platform and we are hooking Windows application with the help of Fermion. Fermion helps to create a simple script and bind with the running application.
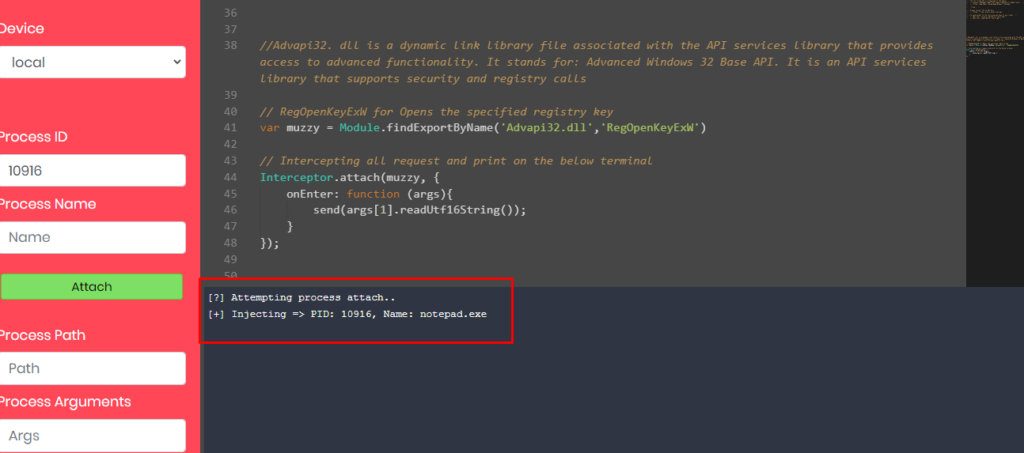
We can attach to a simple Notepad file and view all registry activity of Notepad. I have written the code and obtained the ProcessID of the “Notepad.exe” application. Please view the screenshot below when I clicked on the attach button.
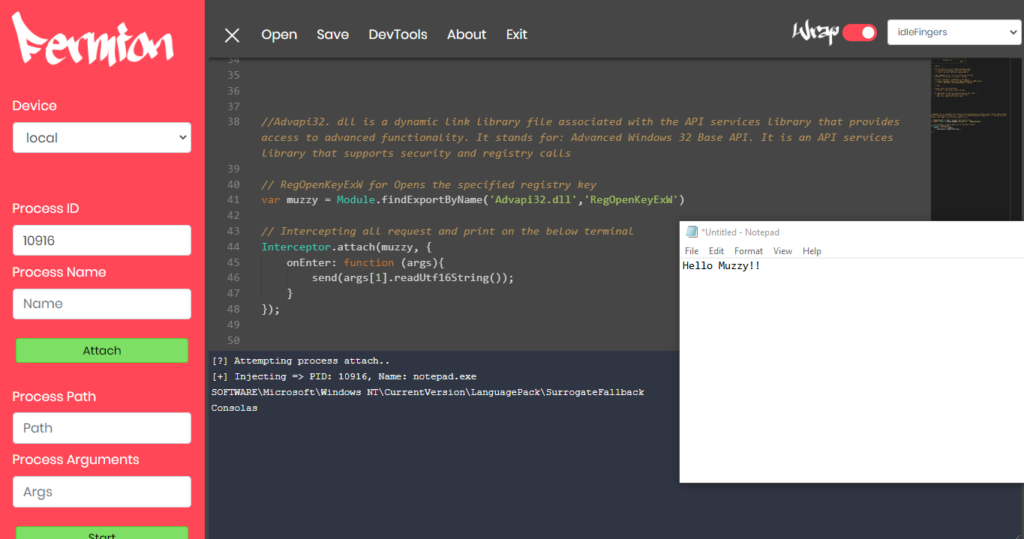
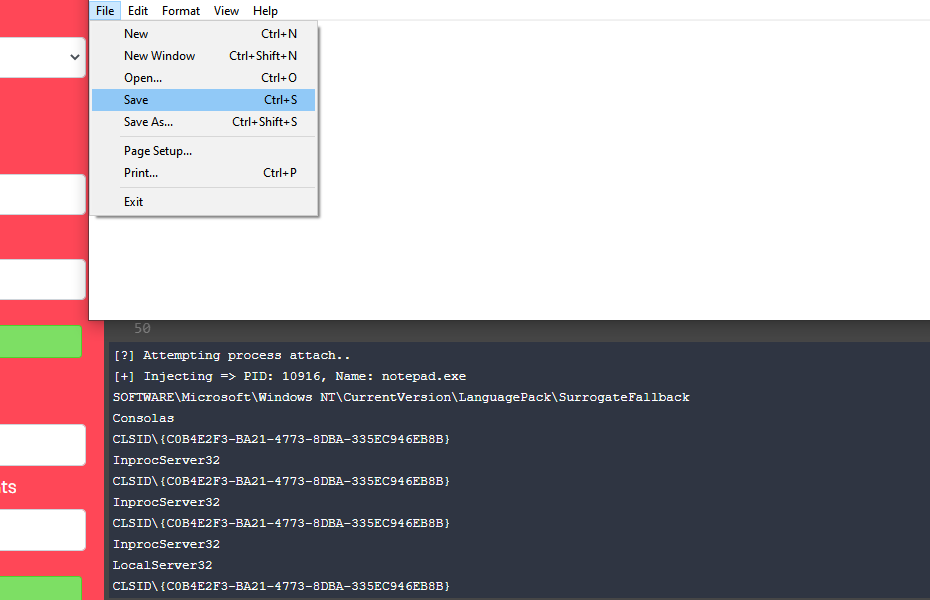
Write something and save the Notepad file. Simultaneously, observe the logs generated from the terminal below.
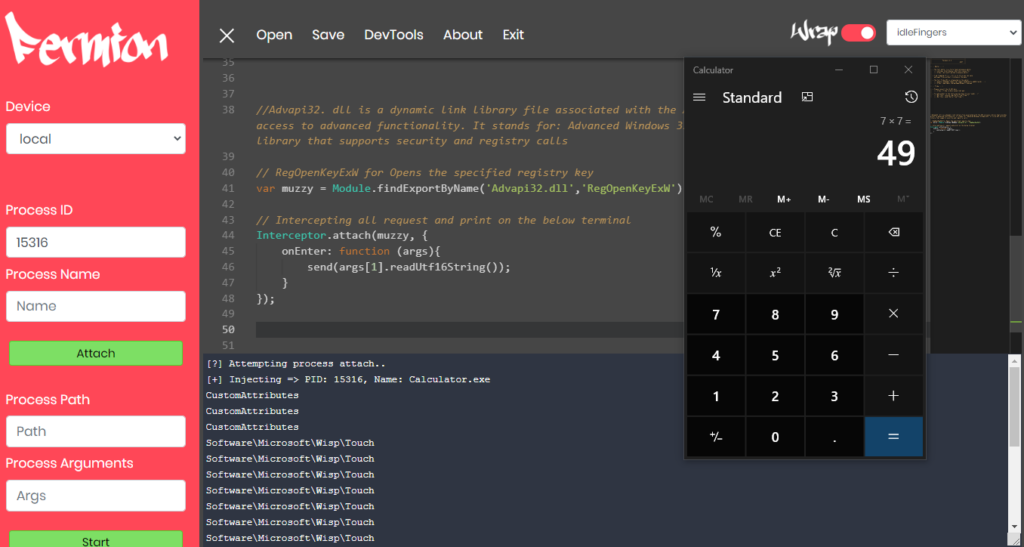
Also, you can attached other windows application like calculator, browsers etc.
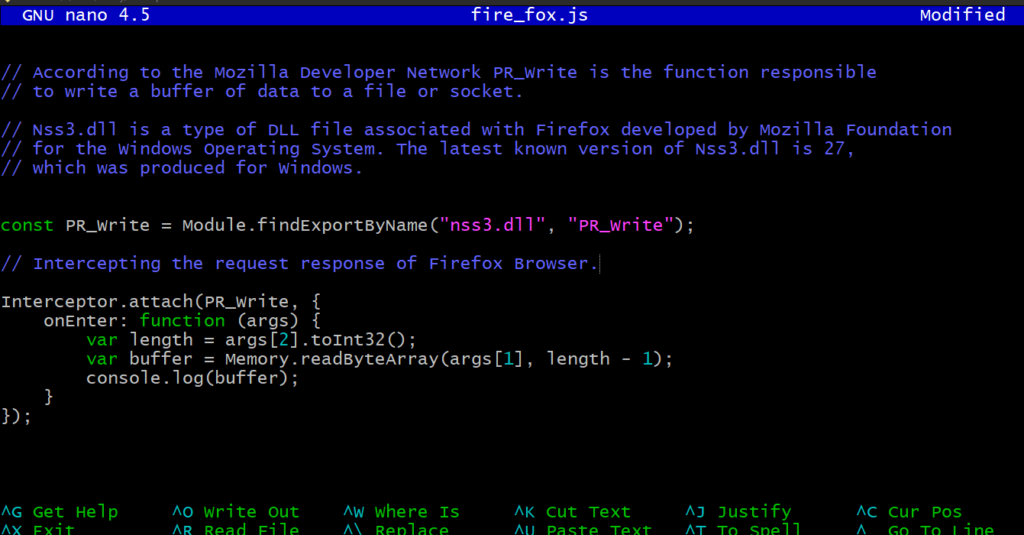
Let’s capture the network logs of the Mozilla browser via a Frida script only.
I have written the code below to print the network packages into the Frida console.
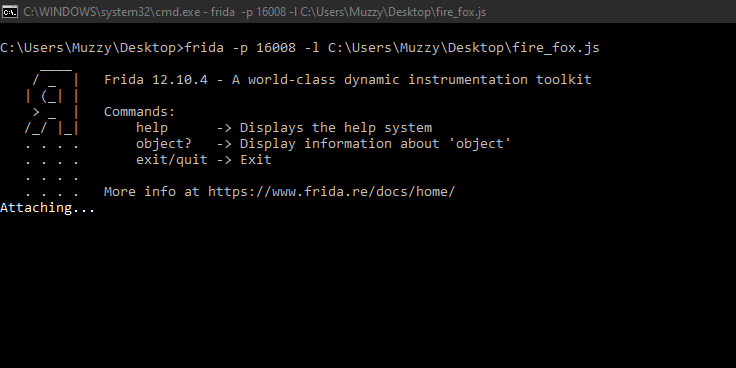
Start the browser and capture the ProcessID via the task manager. Attach the process via Frida using the command below.
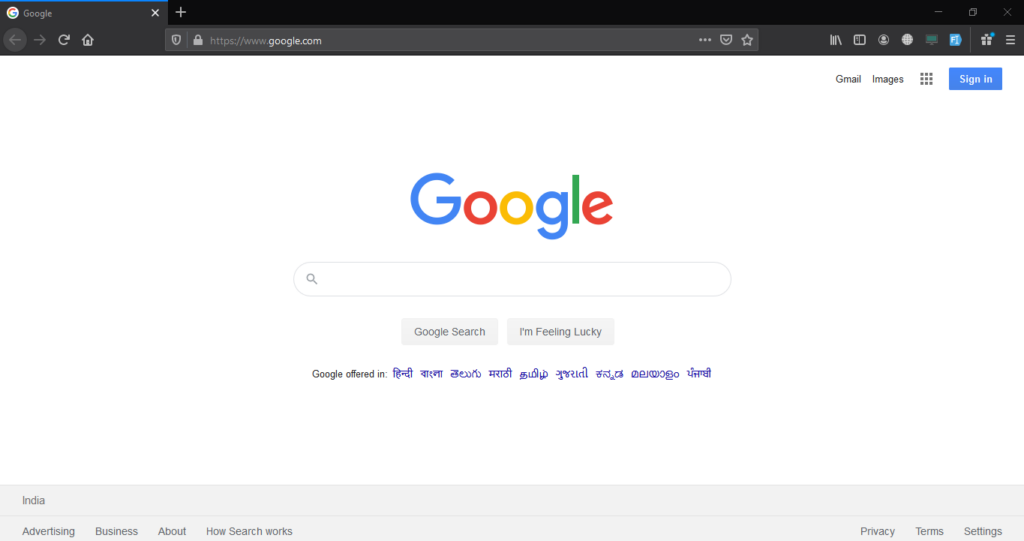
Navigate to the browser and reload the Mozilla Firefox page.
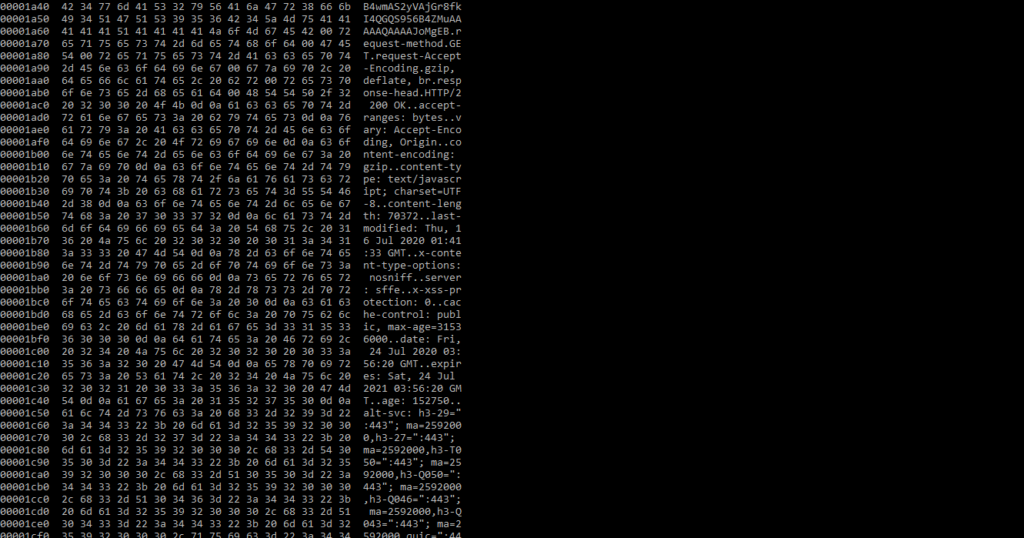
Return to the Frida console to view the network packages.
Closing Thoughts:
Yes, Frida is a very powerful and versatile tool that can be used in many ways. It is a great tool for dynamic instrumentation and analysis of applications, and it supports a wide range of platforms and languages. Some of the other features of Frida include:
- Cross-platform support for Windows, macOS, Linux, iOS, Android, and more.
- Ability to inject code into running processes, allowing for runtime modifications and debugging
- Support for both JavaScript and Python scripts
- Interception of function calls and modification of function parameters and return values
- Ability to interact with low-level system APIs and hardware, like camera and microphone
Frida has been used for a wide range of purposes, including penetration testing, malware analysis, reverse engineering, and application security research. However, it’s important to note that Frida should only be used for ethical and legal purposes, and users should be familiar with the security and privacy implications of using such a tool.
Overall, Frida is a powerful and versatile tool for dynamic instrumentation and analysis of applications, and it can be a valuable asset for security researchers, developers, and other professionals.