Smali Debug Cheatsheet
Smali is a low-level language, and debugging Smali code can be challenging. It’s recommended to have a good understanding of the Java programming language and Android app development before attempting to debug Smali code.
What is smali?
When a developer creates an Android application, the code is first compiled into a set of .class files, which contain JVM bytecode. The dx tool is then used to convert these .class files into Dalvik bytecode and package them into a single .dex file, which is included in the APK file for distribution.
The Dalvik bytecode in the .dex file is in a binary format that is difficult for humans to read and understand. This makes it challenging for developers to modify the behavior of Android apps or debug issues that arise during development. This is where Smali/Baksmali comes in.
Smali refers to the assembler, while Baksmali refers to the disassembler, and both tools are named after their Icelandic equivalents for “assembler” and “disassembler,” respectively.
Smali is an assembler that takes human-readable Smali code and converts it into binary Dalvik bytecode. Baksmali, on the other hand, is a disassembler that converts binary Dalvik bytecode back into human-readable Smali code. This allows developers to easily read, modify, and debug Android apps using Smali code.
Basic commands for decompile and signing the apk:
Signing the APK file is a necessary step in order to install the file onto an Android device. Without signing, the installation will not be possible. There are various methods available to sign the APK file, but the following method is one of the simplest ways to do so.
# Below commands for downloading the Uber signer app and sign example.apk
wget https://github.com/patrickfav/uber-apk-signer/releases/download/v1.2.1/uber-apk-signer-1.2.1.jar -O  uber_apk_signer.jar
java -jar uber_apk_signer.jar --apks example.apk

# Troubleshooting Linux
sudo apt update && sudo apt install default-jre
In order to decompile an APK file, we require a tool called “apktool“. This tool is used to decode the APK file and extract the resources, assets, and manifest file from the binary format into a readable and editable format. This allows us to analyze and modify the code of an Android app for various purposes, such as debugging or reverse engineering. APKTool is a popular and widely used tool in the Android development community.
https://ibotpeaches.github.io/Apktool/install/
To extract the Java code from an APK file, we need to install a tool called Jadx. Jadx is a decompiler that is specifically designed for decompiling Android APK files. It is a free and open-source tool that is available on multiple platforms including Windows, macOS, and Linux. Once installed, Jadx can be used to decompile the APK file and generate the corresponding Java source code. This can be useful for analyzing and modifying the code of an Android app for various purposes such as debugging or reverse engineering.
https://github.com/skylot/jadx/releases
# Install in kali / Ubantu
sudo apt install adb
sudo apt install jadx
sudo apt install apktool
Jadx, Apktool and Zip:
# Apktool
apktool d example.apk

# Jadx
jadx -d [path-output-folder] [path-apk-or-dex-file]
jadx -d output example.apk

# Zip
unzip example.apk
After decompiling an APK file and making necessary changes, the next step is to recompile, sign, and install the modified app on an Android device. This can be done via a single command line using tools such as Apktool and ADB.
Firstly, the modified app needs to be recompiled using Apktool. This will create a new APK file with the updated code changes. Then, the APK file needs to be signed using a key or certificate. This can be done using the jarsigner tool provided by the Java Development Kit (JDK).
Finally, the modified and signed APK file can be installed on an Android device using the Android Debug Bridge (ADB) tool. The command to do this in a single line would be something like:
apktool b app_folder -o app_name.apk && jarsigner -verbose -sigalg SHA1withRSA -digestalg SHA1 -keystore keystore_file app_name.apk key_alias && adb install app_name.apk
In this command, app_folder is the folder containing the modified app code, app_name.apk is the name of the new APK file, keystore_file is the name of the keystore file used for signing, and key_alias is the name of the key or certificate used for signing.
This single line command can save time and simplify the process of recompiling, signing, and installing a modified Android app.
apktool b apk_folder/ -o example.apk && echo "compiled!" && java -jar uber_apk_signer.jar --apk example.apk && adb install -r example_debugsigned.apk
Writing Smali…
Frida-gadget is a small binary that can be injected into an Android application, allowing developers to debug and analyze the app at runtime. It enables the use of the Frida framework to interact with the application’s runtime environment, allowing for dynamic analysis and instrumentation.
To use frida-gadget, you first need to download the appropriate version for your device’s architecture from the Frida releases page on GitHub. Once downloaded, the frida-gadget file needs to be injected into the target application’s process using a tool like adb or cycript.
You can find more information on how to use frida-gadget in the Frida documentation.
# Add any library via frida !!!
const-string v0, "frida-gadget"
invoke-static {v0}, Ljava/lang/System;->loadLibrary(Ljava/lang/String;)V

# Troubleshooting
1.
add ".locals" value which is starting of function.
Example: ".locals 0"  --> ".locals 1"
2.
add frida-gadget.so file at "/lib/arm64-v8a" folder.
After decompiling you via apktool navigate to the folder and paste the frida-gadget file to exactly above location.
To add the Frida Gadget into smali code, you can use the following steps:
- Extract the APK file using apktool:
apktool d <path-to-apk> - Navigate to the
smalifolder in the extracted APK directory and find theApplication.smalifile. - In the
onCreatemethod ofApplication.smali, add the following code to load the Frida Gadget:const-string v0, "libfrida-gadget.so"invoke-static {v0}, Ljava/lang/System;->loadLibrary(Ljava/lang/String;)V - Rebuild the APK file using apktool:
apktool b <path-to-extracted-apk> - Sign the APK file using jarsigner:
jarsigner -verbose -sigalg SHA1withRSA -digestalg SHA1 -keystore <path-to-keystore> <path-to-unsigned-apk> <alias> - Zipalign the APK file using zipalign:
zipalign -v 4 <path-to-unsigned-apk> <path-to-final-apk>
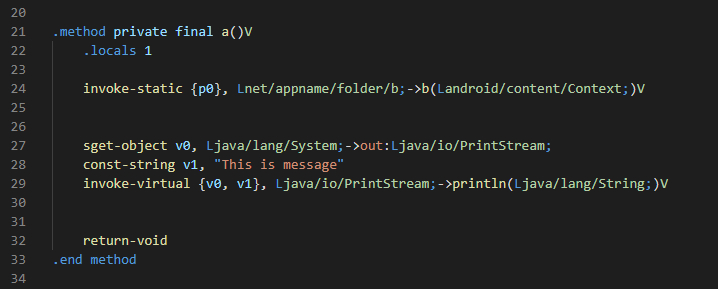
Now the most important smali code might be for you to print into logcat.
# Print own message

sget-object v0, Ljava/lang/System;->out:Ljava/io/PrintStream;
const-string v1, "This is message"
invoke-virtual {v0, v1}, Ljava/io/PrintStream;->println(Ljava/lang/System;)V

# add .locals value by 1/2

--------------------------------------------------------------------------------

# Print value of the variable
# Assume we are printing v7 variable value into logs

sget-object v7, Lnet/appname/folder/b;->c:Ljava/lang/String;
const-string v8, "Printing value : "
invoke-static {v8, v7}, Landroid/util/Log;->e(Ljava/lang/String;Ljava/lang/String;)I

--------------------------------------------------------------------------------

# Print simple message

const-string v3, "App started functionality"
invoke-static {v3, v3}, Landroid/util/Log;->e(Ljava/lang/String;Ljava/lang/String;)I

$ TIP: Use Visual Studio Code for smali editing. It helps you to increase writing speed.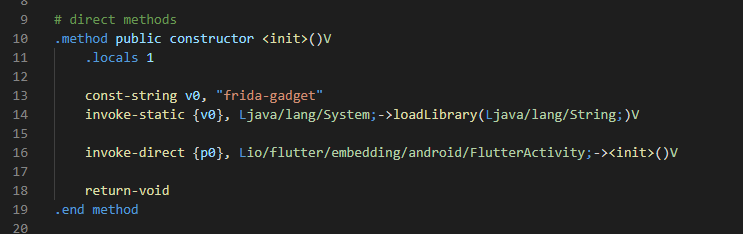
Observe below smali syntaxes which might help you to understand the code more specifically.
    -----------------------------------------------------------
    |  code          |     value                              |
    -----------------------------------------------------------
    |  D             |     double                             |
    |  J             |     long                               |
    |  V             |     void (only for return value)       |
    |  I             |     int                                |
    |  Z             |     bool                               |
    |  Lclassname;   |     instance of classname              |
    |  B             |     byte                               |
    |  S             |     short                              |
    |  C             |     char                               |
    |  F             |     float                              |
    -----------------------------------------------------------

Reference: http://pages.cpsc.ucalgary.ca/~joel.reardon/mobile/smali-cheat.pdf
Here are some additional Smali syntaxes that may be helpful:
.class– declares the start of a class definition..super– declares the superclass of a class..method– declares the start of a method definition..end method– declares the end of a method definition..field– declares the start of a field definition..end field– declares the end of a field definition..parameter– declares the name of a method parameter..line– sets the current source code line number..locals– declares the number of local variables in a method.invoke-<variant>– calls a method, where<variant>can be one ofdirect,static,virtual,super,interface,direct/range,static/range,virtual/range,super/range,interface/range.move– moves a value from one register to another.const– loads a constant value into a register.if-<variant>– performs a conditional branch, where<variant>can be one ofeq,ne,lt,ge,gt,le.goto– performs an unconditional branch to a label.return– returns from a method.new-instance– creates a new instance of a class.sput-object– sets the value of a static field.sget-object– gets the value of a static field.
These are just a few examples of the many syntaxes that are used in Smali. It’s important to have a good understanding of these syntaxes in order to effectively read and modify Smali code.
Examples of smali code:
1. Creating a new instance of a class and calling its constructor:
    new-instance v0, Ljava/lang/StringBuilder;
    invoke-direct {v0}, Ljava/lang/StringBuilder;-><init>()V
2. Assigning a value to a register:
const-string v0, "Hello World!"
3. Branching based on a condition:
    if-eqz v0, :label
    ; do something if v0 is not equal to zero
    :label
    ; continue execution here
4. Creating an array:
new-array v0, v1, [Ljava/lang/String;
5. Accessing an array element:
aget-object v0, v1, v2
Java to Smali:
Writing in smali with such an efficiency is tough !!
Learning smali editing can take years but there is another way where you can directly convert your java code to smali with the help of some basic commands.
javac JavaCode.java
dx --dex --output=classes.dex JavaCode.class
baksmali classes.dex
Here’s an example of how you can convert a Java class to Smali using the commands you mentioned:
- Create a Java file called
MyClass.javawith the following code:
public class MyClass {
    public static void main(String[] args) {
        System.out.println("Hello, world!");
    }
}
- Compile the Java code to Java bytecode using the
javaccommand:
javac MyClass.java
- Convert the Java bytecode to Dalvik bytecode using the
dxtool:
dx --dex --output=classes.dex MyClass.class
- Disassemble the Dalvik bytecode to Smali code using the
baksmalitool:
baksmali classes.dex
This will create a Smali file called classes.dex.smali that contains the disassembled code of the MyClass class. The contents of the classes.dex.smali file will look something like this:
.class public LMyClass;
.super Ljava/lang/Object;

.method public static main([Ljava/lang/String;)V
    .registers 2

    const-string v0, "Hello, world!"
    invoke-static {v0}, Ljava/lang/System;->outPrintln(Ljava/lang/String;)V

    return-void
.end method
Debugging smali files helps a lot to improve the static analysis and dynamic analysis of the application penetration testing